
 |
Anywho, here goes the lowdown on how I made my very first yarn wreath. First let me begin by saying that my hands and wrists were sore after wrapping the yarn around over and over. Don't think I'm going to make another one soon. :)
Valentine's Day Yarn Wreath
Supplies:* 1 - 12 in. foam wreath
*Yarn in Sweet Mocha by I Love This Yarn!
*Craft glue
*Brown chipboard letters
*Pink adhesive gemstones (scrapbook item)

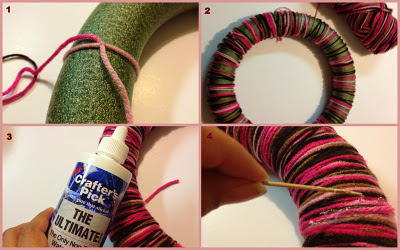
Step 1
To begin, I tied a double knot on the wreath and tucked in the loose piece of yarn a little before wrapping around.
Step 2
In clockwise motion, wrap the yarn around the wreath starting at the knot. It took me three whole turns to completely cover my wreath therefore I had plenty of yarn leftover.
Step 3 & 4
Snip the yarn once you are happy with the coverage and glue down with craft glue. I used Crafter's Pick The Ultimate! glue and I am loving that glue more and more. I rely on it more than my 'ol glue gun. It has lots of holding power. After applying the glue, I used a toothpick to pat the yarn into place. The glue dries clear so there is no obvious mark.

Step 5 (picture not shown)
Sorry, but I accidentally deleted the picture of the chipboard letters and stickers being put on the wreath. But it is a cinch and I'm sure you figured it out, right? :)
Place some gemstone stickers on the letters however you please and then using the craft glue, glue the chipboard letters onto the wreath. Again, in the order and fashion you desire. The chipboard letters are just like the ones I used in my hair bow holder.
And that is how I made my Valentine's Day Wreath. I just love those colors on that yarn. Maybe I'll ask grandma to help me make a blankey or scarf with that yarn. It's too pretty not to use again. :)

I am linking up with these fab bloggers:
Creations by Kara * Verry Merry Vintage Style * I Gotta Create
A Diamond in the Stuff * Ginger Snap Crafts *My Romantic Home
The Artsy Girl Connection One Artsy Mama * Sew Woodsy
Night Owl Crafting * Tatertots & Jello * Nest of Posies

SO cute!! I looove your color combo, and the Xs and Os are a sweet little touch! I wouldn't have thought of that! I admire anyone with the patience to make a yarn wreath, so you go right ahead and pat yourself on the back a little more for me! Thanks for sharing at shine on fridays last week; hope you'll be back tomorrow!
ReplyDeleteVery cool wreath! I hope you will link this up to I Heart Projects Linky Party.
ReplyDeletehttp://www.itsybitsypaperblog.com/2012/01/i-heart-projects-linky-party.html
Thank you, will do!
DeleteYour wreath is darling! I found you through Nest of Posies. Thanks for sharing! :)
ReplyDeleteThank you!
Delete